

Assigning admin privileges to users in ZAAPIT for Salesforce is a crucial step for efficient system management and data administration. Whether you need to grant a user the ability to manage the full layout settings, have the correct admin rights is essential. In this guide, we will walk you through the process of setting users as admins in ZAAPIT.
If you find yourself unable to access the Mass Update/Actions buttons in ZAAPIT for Salesforce, don’t worry. We’re here to guide you through the process. The next steps will set your user as an admin and will allow you to control the grid-layout and advanced settings.
The steps:
Simply follow these straightforward steps to grant your user admin privileges and regain control:
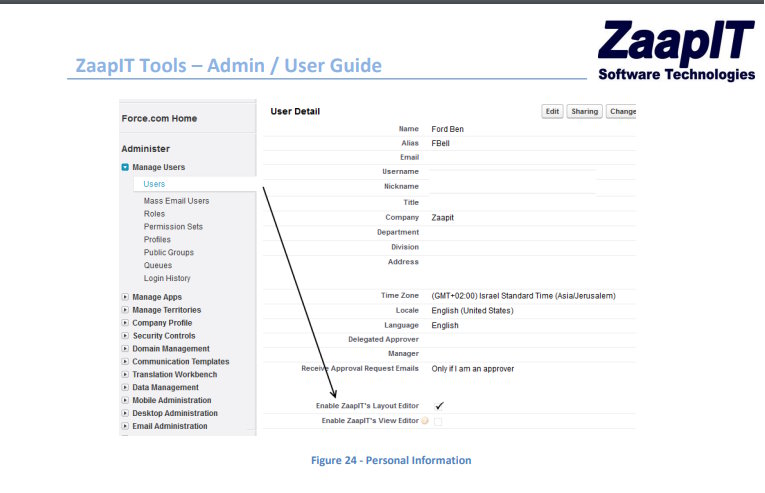
- Go to User details: Begin by navigating to your user details page within Salesforce.
- Adjust Permissions: Once on the user details page, locate the “Enable ZaapIT’s Layout Editor” checkbox and ensure it is checked. Conversely, make sure to uncheck the “View Editor” checkbox to fine-tune permissions (see the following screenshot). If you can’t locate the checkboxes, use the Salesforce layout editor to add them to the layout. The “View Editor” checkbox hides advanced settings and presents users with a non-admin version of the layout editor. It allows non-admin users to control the field-selection, grouping, and filters, and to save those changes only for their views.
- Save Changes: Lastly, confirm your adjustments and save the changes made to ensure they take effect.
- Go to setup > permission sets and add the Zaapit app1 permission set to your user (how to guide).
With these simple steps, you’ll swiftly grant admin privileges to your admin user and regain control over your ZAAPIT for Salesforce environment.
By completing these steps, you’ll empower your ZaapIT user with admin capabilities, allowing them to efficiently manage data and perform actions like creating merge jobs with ease. Remember, it’s essential to mark only one checkbox, specifically the “Enable ZAAPIT Layout Editor”.
Need more guidance? Check out this next article about How to move a Zaapit tab to Salesforce production.
For more information and guides we recommend visiting ZaapIT’s full User/Admin guide.